
When dressing on a budget, a common tactic is to simply purchase an off-the-rack suit with the intention of having it adjusted by a tailor for that custom fit. While this can be a great money-saving measure, there are certain adjustments that even the most talented tailor can’t make. We wanted to take a few minutes to explain a bit more about fitting a suit and the role a tailor can play in preparing you to look your very best.
When you try on a suit, you’re looking for a good fit in what tailors call your “natural stance.” That means standing up straight – preferably in the kind of dress shoes you’ll be wearing with your suits – relaxing your arms at your side. If the suit doesn’t fit well in this stance, it’s not going to move comfortably with your body either.
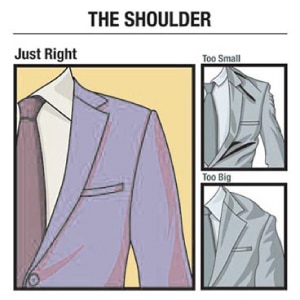
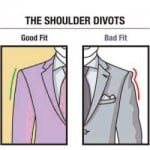
A well-fitted shoulder lies flat. The seam on top of the shoulder should be the same length as the bone under it, and should meet the sleeve of the suit right where your arm meets your shoulder.
If the seam that connects the sleeve to the jacket is hiked up along your shoulder bone, or dangling down on your upper bicep, you’ll see “ripple effects” that create lumps or wrinkles on the sleeve and the top of the jacket.
KEY:
Shoulders are one of the hardest parts of a jacket to adjust after construction, so don’t buy a piece with an ill-fitted shoulder. Odds are you’ll never be able to get it quite right with post-purchase alterations.
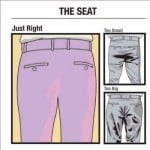
The back of your trousers should lie loosely against your underwear, without pulling tight against your backside or draping loosely down your thighs.
You can spot a bad fit in the seat when there are horizontal wrinkles just under the buttocks (caused by too tight of a fit), or by loose, U-shaped sags on the backs of the thighs (caused by too loose of a fit).
KEY:
A tailor can “take in” a seat to make it tighter in the back without too much difficulty, but there’s a limit to how far he or she can go. If the seat is far too loose to begin with, it’s often not possible to adjust the fit without pulling the pockets out of place. Most pant seats cannot be “let out” very far to create a looser fit, so err on the side of too loose rather than too tight.
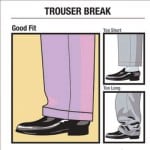
The “break” is the small wrinkle caused when the top of your shoe stops your trouser cuff from falling to its full length. This should be a small, subtle feature. One horizontal dimple or crease is ideal. This is one of the easiest adjustments to make, so you can rely on making some changes here if you need to.
KEY:
The cuff should indeed rest on the top of your shoe — there needs to be contact — but it shouldn’t do much more than that. The trouser can fall a touch longer in the back than in front, so long as it’s still above the heel of the shoe (the actual heel, not just the back of the shoe).
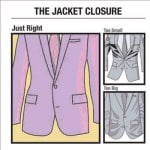
When you are wearing a suit and standing, you should have the jacket buttoned. This means that part of the fitting process is checking how the front of the jacket closes over your body while buttoned.
Close a single-breasted jacket with only one button clasped while you’re testing the fit, even if it’s a three-button jacket. You’re looking to see if the two sides meet neatly without the lapels hanging forward off your body (too loose) or the lower edges of the jacket flaring out like a skirt (too tight).
The button should close without strain, and there should be no wrinkles radiating out from the closure. A little bit of an opening at the bottom of the suit is fine, but the two halves beneath the button shouldn’t pull apart so far that you can see the shirt above your trousers. (Ideally, you shouldn’t see any, though a bit is socially acceptable, especially when you move.)
KEY:
Taking in or letting out the waist to help the jacket close more comfortably is not a difficult adjustment, but it’s one with limits. If the jacket closure looks really bad unaltered, it’s probably due to problems beyond the waist measurement, and you should be looking for a different jacket rather than planning on getting that one altered.
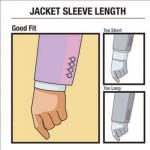
“A half-inch of linen” is a good, old-fashioned guideline — about half an inch of the shirt cuff should be visible beyond the jacket cuff.
That said, it’s a general guideline, and you don’t need to get too obsessive about this factor. What you do need to be sure of is that the seam where the shirt cuff joins the shirt sleeve is never visible. Similarly, the jacket sleeve should never hide the shirt sleeve entirely.
KEY:
Sleeve length is a very easy adjustment for a tailor to make, so get the best sleeve length you can (erring on the side of too long if possible) and then have it adjusted to fit.
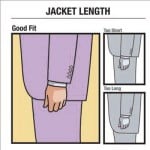
A good suit or sports jacket should fall past the waist and drape over the top of the curve formed by the buttocks. An ideal fit will cover a man down to the point where his butt starts to curve back inward, and stop there.
The hands are also a good marker here, and this is why it’s important to have your arms relaxed in your natural stance. The hem of the jacket should hit right at or just past where the fingers meet the palm.
KEY:
If the hem of the jacket is sitting on top of the butt, with a small little flare in the back, it’s too short. If it falls past the bottom entirely, longer than the arms, it’s too long. The hem can be adjusted upward without trouble, but if you go too far the front pockets start to look out of proportion.
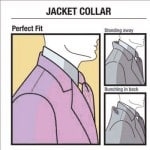
Your jacket collar should rest against your shirt collar, which in turn should rest against the back of your neck. All of these should touch lightly together, without significant gaps in between.
If the collar is too loose, it’s very easy to spot — there will be a gap where it’s flopping back off your neck.
A tight collar is a little harder to spot on a jacket, since (unlike a shirt collar) it’s almost all in the back. A tight collar will create bunching and folds just beneath it, and often wrinkles the shirt collar underneath.
Bad collar fit could just mean the neck size is wrong for you, but it’s often caused by a larger fit issue: bad shoulder sizing, a back panel that’s too small for you, or even a jacket that’s constructed with more of a forward or backward tilt than your neutral stance.
KEY:
Since these adjustments cost time and money to fix, this is an important area to get right when your purchase. Look for as good of a fit in the original jacket collar as you can find.
There are a couple problems that are major warning signs. A suit with these “bad fit” signs is one that you probably won’t ever be able to adjust to a really good fit. Unfortunately, most of these are caused by the core structure of the suit — and that means that your body just isn’t a good match for the suit or jacket.
If you can’t afford a made to order suit, an adjusted off-the-rack suit can work. You do have to start with a good fit, or you will never get the results you want. Unless you want to pay for alterations, be careful buying any jacket that’s showing these serious warning signs:
If you can see wrinkled lines radiating outward from your jacket button when you close the jacket, it’s too tight and will need adjustment.
Front button strain is indicative of a bad fit in the torso, and it can go beyond just the waist size — you’re probably straining at the shoulders or in the back, too. It also means the button is going to be prone to popping off.
If the sleeve of the jacket seems to dip in slightly just under the shoulder, and then flare back out again, the shoulders are too big. What you’re seeing is the shoulder padding protruding beyond your arm, and the cloth of the sleeve tucking back in underneath it.
You can also get those wrinkles if you’ve got a somewhat slouched stance and the jacket is stiffly-constructed for a more upright posture. In either case you’ll need to get a smaller size, so that the seam where the shoulder meets the sleeve matches up with your body’s shoulder.
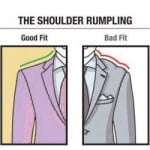
If you’re getting noticeable bunching on top of your shoulder, rather than on the upper sleeve, the jacket is too large in the shoulders.
This can be a simple length problem, but most likely it’s that the interior space is too large — your shoulders aren’t broad enough, front to back, to fill out the jacket. Try a slimmer fit, or a smaller size.
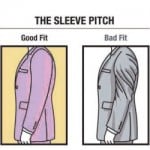
Faint spiraling wrinkles on the outside of the sleeve occur when the angle of your arm in its natural stance doesn’t match the angle that the sleeve was constructed with. The result is a sleeve that looks slightly twisted even when your arms are hanging at your sides.
A tailor can theoretically remove the sleeves and reattach them at a slightly different angle, but it’s not a simple or a cheap fix. Generally speaking, you can consider this one a deal-breaker.
Always remember, if you need any of your suits adjusted or would like a professional opinion, stop by any Clothesline Cleaners location. Our professional Tailors and Seamstresses would love to help you look your best. And when it’s time to clean your perfect suit, Clothesline Cleaners can help with that as well.